Thursday, November 21, 2013
L.E.D Belt Buckle
Here is a video of the lights and L.E.D. belt buckles going. I have to reprogram the front light characters, but you get the idea.
Sunday, November 3, 2013
Trick or Treating R2 and U.F.O.
Well, it was a mad dash to get R2 reassembled and moving in time for Trick or Treating today! Once assembled I had to get all of the motor wiring attached, battery boxes mounted, dome lights installed and the front foot working.
The front foot was very problematic. I had finished the detailing on the sides and built out the skirt only to discover that the skirt was dragging in the back. So I used my Dremel MultiMax to trim some height off the foot skirt, but the caster was also being very flaky. I wound up buying a new rubbery caster at The Home Depot since the plastic one I had was not turning very well and was skittering around. I am still not happy with how the caster performs but it was OK for today's outing.
Kids and parents alike were very excited to see R2. Many wanted to take pictures and some were curious as to how he was built. Some people stopped their cars to get out and look! It was a lot of fun!


I helped my son build a "crashed U.F.O." as well with an extra clear dome like the one I used for R2. He illuminated it witjh lights and had his fog machine cranking out smoke. Good stuff!


Monday, September 2, 2013
Feet are complete!
I finished the feet this weekend and took advantage of the extra day off for Labor Day to get them painted. I am very happy with how they turned out. When I started putting the side details on a realized that I could put an extra skin of 1mm styrene on the other sides. This corrected some construction defects and the edges where the sides meet the back and the front turned out especially well.
I simplified the half moon construction, since most people won't even notice the missing detail. I filled the small gap between them and the sides with a thin bead of latex caulk which all but disappeared after the final coat of white satin paint.
I started on completing the center foot which had been damaged when I knocked it off my workbench. Doh! I am doing the re-skin process on that one as well. Stay tuned.


Sunday, August 11, 2013
Foot Build Progress
I finally got around to putting the bottom skirt on the main feet. I cut thouse pieces out of 1/4" sintra. Very durable and thick. I plan on adding reinforcement behind the skirt since I have read on the forums that the feet get a lot of use and abuse.
I started to reskin the feet with 1mm styrene to hide the seams where it curves to hold the battery boxes. I also started adding the side details and well as the cutout details along the bottom of the foot.


Next up will be doing the same thing for the other foot and then to build the halfmoon details for the side of the feet.


Sunday, July 7, 2013
Foot progress
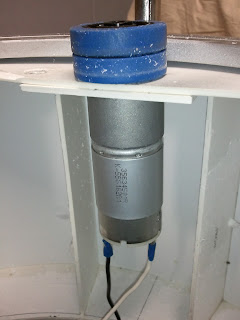
It has been slow going fabricating the feet. I was having trouble with the curved section that goes under the battery box staying put. I had and epiphany one night when I realized I could use a section of plastic tubing from an old roll of Xyron adhesive for that section.
I cut a piece to fit around the motor, then finished off the top part that goes behind the batttery box with 2mm Sintra. I have slotted the battery box bottom so that the drive motor tucks into it and I have an access hole where I will connect the drive motor wiring.
I still need to add the skirt around the bottom of the foot and do some gap filling.


Sunday, April 28, 2013
Dome motor mount - finally!
Although it was a good building experience, I did not use the dome motor assembly I created. I had the motor mounted on a swing arm that was attached to the body frame and then held against the inside of the lazy susan by a spring. Unfortunately, the spring torqued the assembly, causing the wheel to wobble and subsequently "walk" it's way up and off the lazy susan. Very frustrating.
I finally went backed to the source and reviewed Dave Everett's styrene plans to see what he did. And lo and behold, right on the original plans were schematics for where to mount the dome motor! Doh!
I printed out the template, got things mapped out and after a few passes with the old Dremel tool I got things ready. I reinforced the spot on the frame where it mounts with another layer of Sintra. I have seen the area on other builds reinforced with a thin piece of metal, but I need to scrounge something up to use for that.
I mounted the motor with two screws for the moment since I have to remove the lazy susan to get at the third hole spot, but for now it seems very secure with just two.


Body Parts
I have been painting and assembling the legs and other body parts such as the front vents and the octagon ports. The really dismal spring weather here in Wisconsin really put a damper on any painting activities. In the mean time, I fashioned some shoulder buttons out of old soda bottle caps and some assorted washers I had laying around the workshop.
I picked up some 4-1/2" bolts and I intend to fabricate some of the shoulder bolt details next that go in the large pockets of the shoulder as well.


Subscribe to:
Posts (Atom)
